
Creating a shipment using Send To Amazon is simple, but more time-consuming than using Inventory Lab.
The process is as follows:
- Add products to your Inventory
- Select the units you want to send via Send To Amazon, set prep/label owner and set prep categories
- Print FNSKU labels & cover manufacturers barcodes with them
- Input box contents
- Generate UPS Shipping label
- Bring to UPS store or schedule pickup
1. Add products to your Inventory
With this method, you will have to add items one by one to your inventory.
You can do this with your computer or with your cell phone.
If you are using a computer, I recommend you purchase a barcode scanner like this OfficeLab wired scanner.
If you have a larger budget, I recommend you get this Nadamoo wireless scanner.

Obviously, a barcode scanner is not a must have. You can always manually type in manufacturers barcodes or ASINS into the catalog to add your products.
That being said, once you begin to scale and grow, this will become a massive waste of time and energy that can be saved by investing $15 into a scanner.
Alternatively, you can list your items with your phone and utilize your phone’s camera as a barcode scanner.
Barcode scanners are worth the investment, but you will have to start with what you have.
Adding products via web browser
Here’s how to add a product to your inventory via web browser.
Click on this button:

Click on Catalog -> Add Products

This box that I’ve pointed to with an arrow in the picture below is where you want to search for the item you want to add.
If you are using a barcode scanner, click into the text field, then scan your item.
This will automatically populate the field with your product’s barcode and search for your item.
Barcode scanners act like a keyboard and turn barcodes into numerical characters.
You can also search by keywords, product titles and ASINs (Amazon Standard Identification Number).

Note: With my method, you will not have to purchase UPCs. In the game of retail arbitrage you do not create listings on Amazon. You scan for products which already have profitable listings and hop on them. Creating listings and purchasing UPCs is for private label sellers.
Once you enter the barcode, the listing associated with that UPC will populate in the search results.
If it says “Sell this product”, this means that you are ungated in the brand and you can list this item.
To be able to sell an item on Amazon, you must be ungated, which means you have approval. If you are gated in a product, you will not be able to list and ship it into Amazon until you get ungated. To get ungated you can try requesting for approval and hope that you get auto-approved or submit an invoice from an authorized distributor. Read my ungating guide to learn how to ungate any brand you want.

Note: There are certain products that will not let you list in New condition. Even if it says “Sell this product”, the option to list and sell that particular product may only apply to Used or Collectible conditions. Make sure you check before you buy inventory too see if if you are ungated in the products that you are trying to sell.

A product like this Under Armour shoe is restricted and cannot be sold. You won’t even be able to request for approval. Even if you found this product at a good price, it doesn’t matter because you won’t be able to sell it. I am ungated in Under Armour, but for whatever reason all their shoes are restricted. I am only able to sell Under Armour clothing. There are certain products that Amazon doesn’t allow third party sellers to sell. Instead of complaining about this, focus on products that you can sell. There are countless products that are available for third-party sellers to sell on Amazon.

I’m gated in POLO RALPH LAUREN. To list this product, I would have to get approval. If you press “Apply to sell”, you will either be auto-ungated or be prompted to submit an invoice.
You won’t be able to add products into your inventory until you are fully ungated.
Note: Sometimes the Amazon Seller app auto-ungates you, but when you scan your barcode into Amazon Seller Central’s catalog or InventoryLab, it says that you are still gated. That is because the mobile app has a glitch that doesn’t fully ungate you the first time. Don’t worry, if you get the message saying that you got auto-ungated based on your performance history, you are ungated. You may have to reapply on a computer, or on a mobile browser like Safari on your phone for it to show that you are ungated on Amazon. Hopefully Amazon will eventually fix this issue.
Now back to the example of the Nike socks.
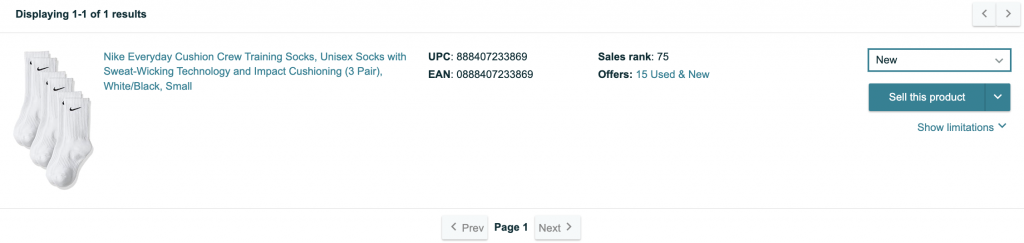
To list the item, select the condition and press “Sell this product”.
It will take you to a screen that looks like this:

Don’t bother entering a quantity.
That is only required for FBM (merchant-fulfilled) listings.
When it comes to FBA, you simply create a listing and then enter the quantity later on when you are entering box contents. Amazon will confirm the quantity received once they get your boxes.

As you can see, once you click on “Amazon will ship and provide customer service”, the quantity box disappears.

As you can see, the lowest price is actually $18.93. That being said, I always price up when I first list my items.
By the time it gets to AMZ, the price could have increased.
You can always reprice your listings once your items are checked in.
Adding products with your phone
Adding products to your inventory with your phone is the same idea as doing it on a computer.
You can press the camera button on the top right corner to access image-recognition search or to scan barcodes with your camera.

Alternatively, you can press “Add a Product”.
This will take you to the following page.

You can search items by name or input the UPC into the search field if you have a wireless barcode scanner.
I just decided to type in the ASIN of the listing to bring it up.
As you can see there are a few variations.
Click on the product to see all the available options.

The first result is the product we are looking for.
Click on the product.

This will bring you to the product details page.
This is the page that shows sales rank data, expected profit after Amazon fees and has a calculator that you can enter in your buy costs to calculate your actual profits if you FBA this item.
Obviously, prices on Amazon are constantly changing, so you may sell the item for more or less than it was when you sourced it.
To add this product to your inventory click on the list button on the bottom right hand corner.

This will bring you to the page where you can create your offer.
This is the same deal as creating a listing on your computer. First, press “Amazon will ship and provide customer service”. Then enter your price and condition. Then press save. Once again, you don’t need to worry about quantity for FBA, only for FBM.

Rinse and repeat this process until all of the products you want to send into FBA are listed in your FBA inventory. This is also something you can do while you are waiting on line at stores such as Burlington or Ross, if you are trying to maximize efficiency.
It will take some time for the items to fully get added to your inventory, maybe about 15 minutes. It’ll say incomplete if it’s not ready yet.
2. Select units you want to send in Send To Amazon, set prep/label owner and set prep categories
Now you want to go to Send To Amazon.
To do this, first, go to the Menu and click on Inventory -> Shipments.
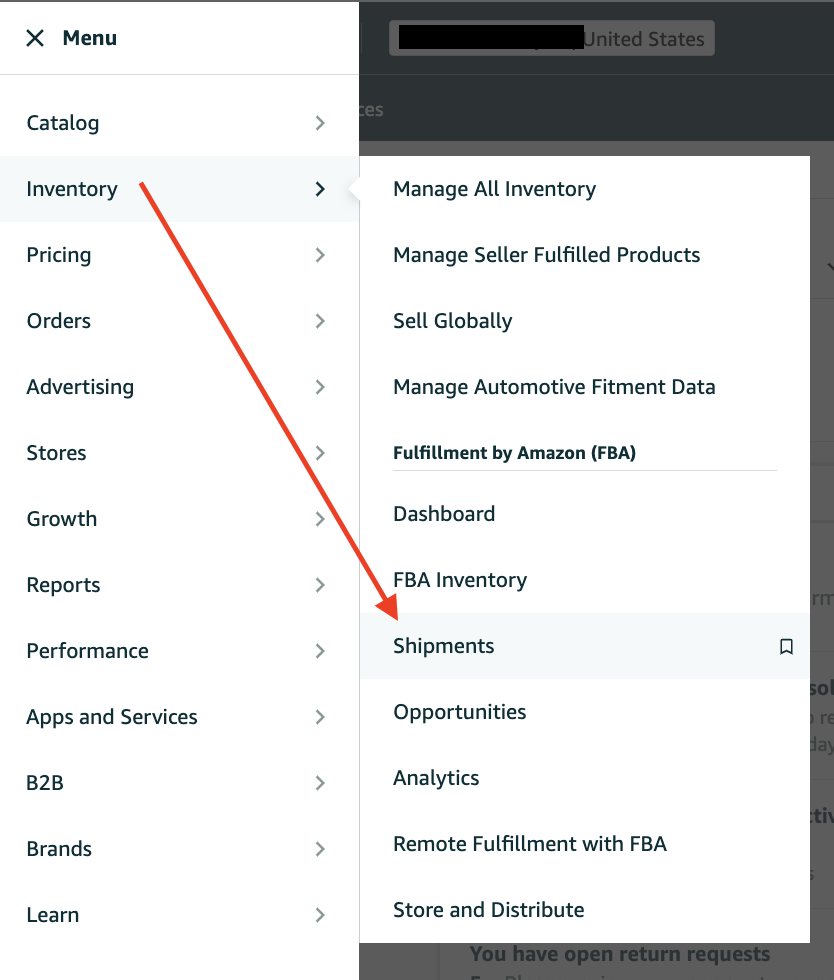
Click on the “Shipments” drop-down menu and you’ll find the “Send to Amazon” link. Click on it.

The first step I always take is to scroll down to the very bottom and click on “Start new”.
This is especially important if you regularly ship out boxes, because your previous shipment or drafts may still be populated here and you want to make sure you’re starting off from a clean slate.

Now you want to go to the search bar I circled in the picture below and search for the items you are trying to add to your batch.
If your items are not showing up here, you may have to wait 15 minutes to an hour for your listings to show up.

After the item you searched comes up, add the quantity of units you have into the box that I’ve pointed to with the arrow in the picture above. Once you have the right amount of units inputted, press ready to pack.
Do this for all the items you want to add to your shipment.

Once you’ve finished with this and press continue, you’ll get a notification saying that certain SKUs have an error and need prep and labeling details.
Check the box that says “Show all SKUs with errors”.

You can bulk select your listings to set the prep category and to set the prep and label owner. Click on the check box that I’ve pointed to in the picture below to select all the items on this page. Note, if you are sending in a lot of items, you may have to do this page by page until there are no more errors.

The next step is to set your prep category.

Most products will be “No prep needed” unless they fall into specific categories, which Amazon has specifically detailed. If you are unsure, click on “Prep guidance” to learn about the different prep categories. You should familiarize yourself with this list so that you have an idea of what prep to expect with certain categories of items before you decide to purchase them in store to resell.

Go through the list and find the prep category that best fits your item. If you are not sure, click on a specific prep category and it will go into more detail as to what it is.

For the most part, all clothes will be in the apparel category.
Shoes and toys will be no prep needed.
If a toy is more like a plush, you might have to poly bag it.
That will be in the “Apparel, fabric, plush and textiles” category.
If a toy has loose parts, poly bag it anyways, and select “No prep needed”.
You can also set the prep category as “sold as set”.
This is for bundles of items (i.e. 3 pack, 6 pack, 12 pack). You will need to make sure the barcodes are not exposed and put a “This is a set” sticker on the outside of the polybag along with the FNSKU label.
Beauty products must be polybagged unless they have double seal. Same with powdered goods.
Glass products such as salsa jars, honey jars, ceramics and glassware must be bubble wrapped and belong in the “fragile/glass” category.
When in doubt, search Google. All the answers are out there.
Next, set your prep and label owner. I recommend you prep and label all your items yourself to avoid paying Amazon more fees.
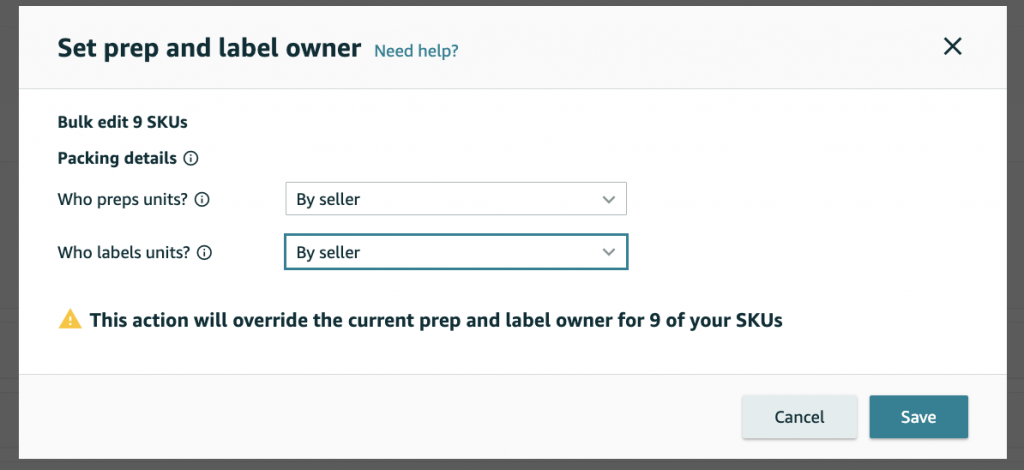
Press save and then close. If it says “Prep and label owner updates failed” ignore it and press close.

While you can pay Amazon to prep and label items for you, I do not recommend this because you are going to be overspending on something that is relatively easy to do yourself. This is especially true when you are starting off. Don’t be lazy, put in the dues and do some work.
If you are going after massive volume and speed, this could be useful if the items you are selling have high margins that could easily cover the prep and label cost. I may experiment with this in the future, because allowing Amazon to prep and label your items means that you could theoretically ship out boxes while you are on the go or traveling, simply packing items into boxes, putting shipping labels on the box and letting Amazon handle the rest.
3. Print FNSKU labels & cover manufacturers barcodes with them
Once you’ve added everything to your shipment that you are trying to send, click on “Print all SKU labels” to generate FNSKU labels.
These are the labels that you will be putting over the product barcodes.
Make sure you cover the UPCs completely.
This will help you avoid shipment problems and missing units.
If you are utilizing a normal office printer, you will need Avery labels.
In the Print all SKU labels popup, set your printing format as “Standard formats” and set your SKU label printing format to be “30-up labels 1″ x 2-5/8″ on US Letter”. This will work perfectly with these Avery labels.

I recommend that you eventuallyinvest in a thermal label printer, because they do not use ink but instead use heat-technology to print on the labels.
This will save you hundreds, if not thousands of dollars in ink costs over the course of your Amazon selling journey.
While I have Rollo printers that I purchased back in the day, there are better options now that cost less money and have more features.
Rollo costs more simply because of the name-recognition and marketing.
I recommend you get the PEDOOLO printer.

Functionally speaking, this costs a fraction of price of the Rollo, but also has features that even the most expensive wireless Rollo doesn’t have such as Bluetooth printing.
The Chinese competitors have been innovating and I recommend you take advantage of these technological advances and cheaper prices.
I recently purchased one of these for my storage unit and personally think it’s even better than both of my Rollos with all the added features.
You will need thermal labels to go with your thermal printer.
Luckily, the PEDOOLO comes with a stack of 4×6 labels which will last you multiple shipments.
That’s the size you need for the UPS and FBA labels that go on the outside of the box.
That being said, you will still need to obtain FNSKU labels, which are the labels that go directly on the product itself so Amazon knows which inventory is yours at their warehouses.
I recommend 30334 labels for FNSKU labels. I previously used 3″x1″ labels but found them to be too skinny to properly cover UPC barcodes without having to turn them diagonally.
This size is virtually perfect for all barcodes.
Here are the ones I use:

If you’re gong to be going the thermal printing route, you’ll want to set your printing format to be “Thermal printing” and set the width and height to 57×32 as pictured below. This is the size of the 30334 labels I recommend.

Once you’re done labeling all your items, press “Pack individual units”.

4. Input box contents
This will bring you to the next step, which is packing individual units into boxes.
If everything fits into one box, simply press everything will fit into one box, weigh the box and measure it. No box contents will be required.

That being said, more often than not, multiple boxes will be needed. This will require you to submit box contents so that Amazon knows which boxes contain which units.
Alternatively, you can do what I do sometimes, which is weighing out a bunch of items until you hit 50 pounds, creating a shipment that won’t require multiple boxes, and then creating an entirely new shipment for each box. This can allow you to avoid having to create box contents. That being said, there’s no guarantee that you won’t get an unavoidable split doing this. From my experience, larger shipments with higher quantities tend to get less splits.

Once you confirm multiple boxes will be needed, click confirm.
This will bring you to the next section.
You will need to specify how you will be providing box contents.
There are a few methods.
I use the web form if it’s a simple and easy shipment where the products are easily identifiable.
If I’m shipping out clothes or shoes, I tend to use Excel because it’s difficult to identify which product is which once they are polybagged or in their respective shoe boxes. With the Excel spreadsheet, I can use Command-F (Control-F on PC) to look up FNSKUs by scanning my FNSKU label with my barcode scanner during the process of filling out my box contents.
Watch this video to see how I currently use Excel spreadsheets to provide box contents:
That being said, in this example, I will be showing you how to use the web form.
Keep in mind that there is a maximum of 10 boxes that you can enter box contents for with the web form. Any more than that and you will be required to use Excel spreadsheets.
Enter how many boxes you expect your shipment to require then press “Open web form”. The exact number of boxes isn’t important because you can add or subtract them later.

This will bring you to this page. As you can see, it shows you all the products in your shipment as well as how many units are boxed. You will need to indicate where each unit is going.
This can be a bit tricky and requires practice to master.
Your goal is to require as few boxes as possible and to fit as many products as you can in each box.
You will have to play Tetris with your items to fit them in the best way.
You may have to move certain items to a different box so they can fit better.
Make sure you stay organized and don’t mess this up.

As you can see, in the picture below I’ve entered the box contents and I’m ready to confirm my packing information.

Scroll down to the bottom and enter your box weight and dimensions.
You want to use the perfect size box for your items. Make sure it’s not too big and there’s not a lot of empty space in the box because then you will be overpaying for shipping. Many times I will cut down boxes to make them more compact.
Also make sure that your items are safely packed and have adequate packing material in the box so they don’t move around. UPS workers will be stacking these boxes and throwing them around so make sure you pack it well.

Once you finish submitting your information in the web form, press confirm and continue.

Now the hardest part is complete.
5. Generate UPS Shipping label
Select the date you will ship out your product. Make sure you choose a date you can actually ship it out, because Amazon needs this to be accurate. It’s better to ship it a day earlier than a day late. Don’t be a lazy, tardy asshole.

Use UPS (Amazon partnered carrier) because it will be the cheapest.
You can expect to pay $10-15 for 50 pounds of products.
You won’t find these discounted rates elsewhere.

Press accept charges and confirm shipment.

Now all you have to do is print out your labels using your thermal printer.
The format is 4×6 inches.

6. Bring to UPS store or schedule pickup
Now you’re all done.
Two labels will come out.
The 4×6 shipping label (UPS) and another 4×6 label (FBA label).
Put them both on the same side.
All you need to do now is bring it to the UPS store or schedule a pickup.
You can use Pirate Ship to schedule UPS pickups for only $4.
Click here to read Part 3 and learn how to use Inventory Lab to do this even faster.
hello i got a question ..how do you know how to send to amz …like the adress or somthing else..and btw thank you very much for ur help with the guides.
Follow the steps of this guide. Amazon will tell you which warehouse to send it to and give you the labels